– PART ONE –
How to Get An Invisible Break Near the Center of the Deck
Easy card tricks are sometimes not that easy! Many of my students start out hoping to master the perfect Pass, only to discover their goal is impossible to achieve. In fact, you won’t be able to master ANY advanced sleight of hand – unless you’ve first made sure nobody EVER sees you obtain or maintain your secret breaks.
For this reason, just about everyone we work can benefit from taking fresh look at the fundamental fourth finger flesh break (often called the pinky, or fourth finger break), how to ‘get into it’, and how to maintain it – imperceptibly – in performance.
Here’s the first big secret. Your approach MUST vary – depending on the context and the position of the break in the pack.
First, we’ll talk about the easiest of the fourth finger breaks, and show you how to obtain a perfect flesh break near the center of the deck.
On the Flesh Break
Make sure not to insert the tip of your pinky between the packets (photo 1). The fingertip, stuck into the deck, splits the pack into halves. This makes it almost impossible to align the packets perfectly so that the break can’t be seen.
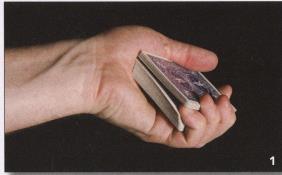
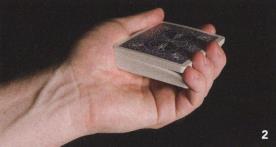
Instead, try holding the break only with the fleshy pad, not the tip, of the finger. Now the deck remains as one unit (photo 2). You don’t need to worry about holding the packets together because there aren’t two packets to hold!
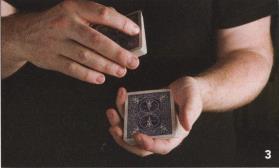
That said, it’s easy to understand why many folks just learning fall into the “fingertip ” trap. Most of the time we’re instructed to obtain a break, it’s between two halves of an already separated deck – as in the replacement procedure shown above (photo 3). In a case like this, it’s very difficult to obtain the break imperceptibly because the pack is in two distinct pieces.
Enter: The Jog
Using an in-jog allows you to get around the problem and 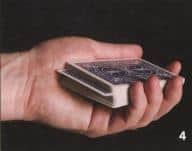 makes obtaining a break a lot easier. If you’re using the Overhand Shuffle Control you probably already know how to create an in-jog. Just maintain the jog as the cards fall back into dealing position (photo 4).
If you don’t want to use the Overhand Shuffle Control, here are two other jog approaches you can work with:
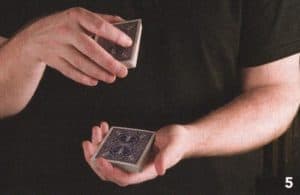 1) Start by holding the right-hand packet in a Biddle Grip, above and slightly behind the left-hand cards. We’ll assume that the spectator has just replaced their selection on top of the lower half. Tilt the upper packet downward slightly (photo 5).
If you’d like, you can assume this position this a few moments earlier, as spectator notes the selection. In either case, this movement is difficult to detect. After the selection is replaced on top of the lower half, lightly drop the right-hand packet so that the lower card of the top half remains in-jogged as the cards above it slide forward.
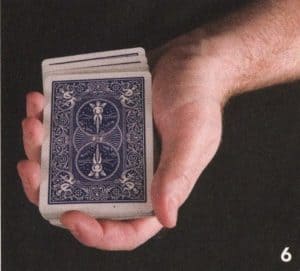
The dropped cards stop moving when they butt against the left first finger at the front edge of the pack. When correctly executed, it’s impossible for spectators to see the in-jogged card. You may get a few extra jogged cards above the one you want, but that will have no effect on your ability to get the break in a moment; just carry on (photo 6).
This wonderful approach is commonly credited to Paul LePaul and appears in The Card Magic of LePaul, published in the late 1940’s. If you’d like an even more refined approach to this same concept, you’ll want to seek out Jerry Andrus’ method, in which the upper packet is not tossed forward, but has its upper end tilted downward. It’s then dropped straight down onto the lower packet. When the lowermost front edge of the upper packet hits the top of the lower packet, the bottom card or two to the upper packet are automatically shoved inward.
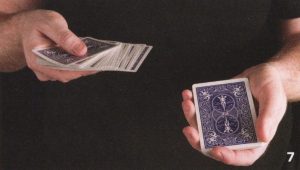
2) For another jogging method, imagine your spectator has just taken a selection from the spread. Break the spread near the center of the deck, your right hand holding a spread packet, your left hand holding the other portion extended for replacement of the selection (photo 7).
Pay special attention to the position of the right finger-tips on the face card of this packet. They should be resting near the center of the card (photo 8).
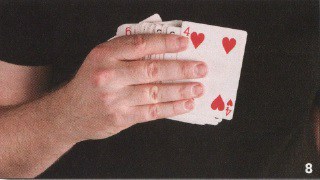
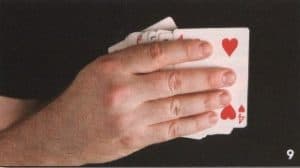
As you’ll soon see, it’s important that the right fingers don’t extend too far toward the left edge of the card. Photo 9 shows what it looks like when the fingers extend too far.
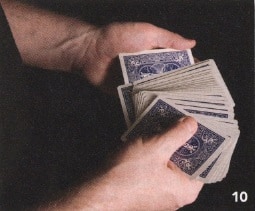
The key to in-jogging the bottom card of right hand’s spread packet, is to avoid getting your right fingers caught between the packets as you square the deck. To do so, leave no “triangular” space between the packets as the spread cards come together with the lower half. The bottom part of the spread should move flush against the lower packet. As you continue moving the packet to the left, use the right fingers to slightly in-jog the bottom card of the spread (photo 10). Then drop your right fingers out of the way and complete the right-to-left squaring action.
Whether you’re used to the Overhand Shuffle Control (which uses an in-jog), or one of these other two approaches, you’re now in perfect position to catch an elegant, invisible fourth finger break.
After Your Jog, Take a Nice Break
Now that the deck is back in one unit, disturbed only by a jog, it’s relatively simple to turn that jog into a pinky flesh break.
Hold the pad of your pinky against the side of the deck – centered on the side edge of the jogged card.
No matter how you got to this position, the pack has been squared right to left, but not front to back. Thankfully, this completely justifies the small squaring action you’re about to make.
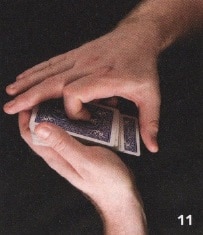
As you move to square the cards, the right fingers go to the front of the pack, with the first fingertip curling and applying downward pressure to the top of the deck (photo 11). At the same time, place the joint of your right thumb against the back edge of the in-jogged card near to it’s right side (photo 12).
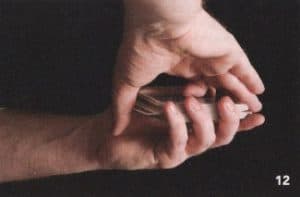
With your right thumb, gently bend the jogged card upward. Thanks to the right first finger and its downward pressure, the top half of the deck does not rise. Instantly, a small break appears at the lower right corner of the pack (photo 13).
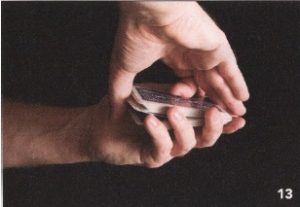
Notice that this break does not and should not extend beyond the lower right quadrant of the deck in either direction. In other words, except for the back right corner, this action doesn’t divide the deck into two portions. Now, allow a bit of flesh from the pad of the left pinky to be trapped between the halves as you release your right thumb pressure on the in-jogged card and neatly square the pack.
If you’ve gotten this far, you’ve made a great start. But remember, the test of an effective flesh break is performance: being able to maintain an invisible break during the show. Learning to do this will take practice, but the method is quite simple.
The left thumb applies pressure firmly and evenly to the left side of the deck. The outer phalange of the fir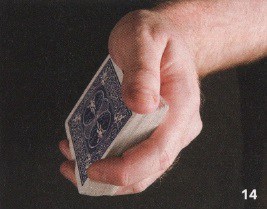 st finger applies light downward pressure on the deck at the front edge. The second, third, and fourth fingers do the same along the right edge. Now allow your hand to relax, and tip a few degrees to the right. Unless your spectators lie on the ground and look up, they won’t be able to see the break from any position (photo 14).
If you’re just starting to apply this level of detail to your card work, your mirror will help you a lot! If you can see anything more than the faintest line along the front of the deck, you need just a bit more practice. But a little patience and determination will go a long way. Just knowing that there is more work to be done is more than half the battle!
Once you’ve gotten comfortable with holding a break near the center of the deck, you’ll be ready to take on the next challenge: dealing with the pinky break when it occurs near the bottom of the pack.
– PART TWO –
How to Get a Fourth Finger Break Near the Bottom of the Deck
Now, we’ll talk about how to deal with breaks near the bottom of the deck. These are the breaks that are often used in multiple card switches, reverses, and palms. We’ll share several approaches. The first few will be surprisingly easy to learn; the final two will require a bit more effort.
Along the way, notice how each approach satisfies some conditions at the expense of others. The advanced methods, while more challenging to learn, offer more direct handling you’ll come to value as your skill develops.
You’ll have to make your own best choice about what methods serves your personal needs best. In this section, we’ll arm you with the best options to selection from.
How to Hold a Break Near the Bottom of the Deck
Holding a break comfortably near the bottom of the deck requires a different approach than holding one near the center. Without many cards below the break, you can’t count on pressure from the lower half of the deck to pinch the flesh of your fourth finger the way it does when the deck is more evenly divided.
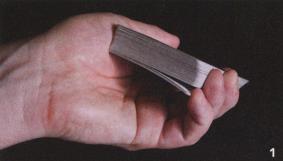
For this reason, the left fourth finger will have a more delicate job to do. For starters, it will be in a slightly strange position: curled so that the pad can reach the sides of the bottom cards of the pack. There, the fourth finger applies pressure directly to the edges of the cards below the break, allowing you to hold them firmly against the base of the left thumb (photo 1). This pressure ensures that the flesh of your fourth finger pad remains securely trapped between the packets.
The Right Thumb Count
This is the approach favored by beginners. In this method, you bring your right hand over the deck, bevel the cards inward, and let the required number of cards slip off your right thumb. Most of the time, the right hand tends to pull up on the deck. Combine that with the length of time the right hand must linger at the pack to get the break, and you have a recipe that’s likely to arouse suspicion (photo 2).
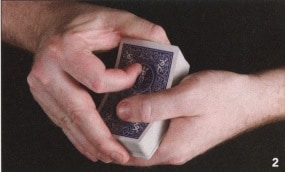
The Right Thumb Count can occasionally be used to good effect, but only when the audience’s attention is focused entirely elsewhere. The best thing to do is study the more efficient, imperceptible methods, and discover the inherent tradeoffs in each. Then you’ll begin to understand just when and where this method can be very effective.
The Overhand Shuffle
When it doesn’t matter if you disturb the order of the cards, you’ll be able to use the Overhand Shuffle to obtain a fourth finger break near the bottom of the pack. It will allow you to get a break above the required number of cards with ease. This is one of my favorite methods for real-world use.
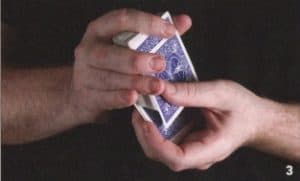
Starting with the deck in dealing position, shift the cards to Overhand Shuffle position. In this example, we’ll get a break above four cards. Use the left thumb to run the first four cards (photo 3), in-jog the fifth card, then shuffle off. This simple, deceptive approach is easy to execute, even when you find yourself in ‘high pressure’ situations.
Note: After running the first few cards and setting the in-jog, many students rush through the rest of the shuffle, never running another series of cards during the sequence. (Remember that by “run”, we mean to take cards singly). Take care to alternate running cards, and shuffling-off in packets, until you complete the shuffle. Otherwise, the first part of the shuffle raise unwanted suspicion and spoil the effect.
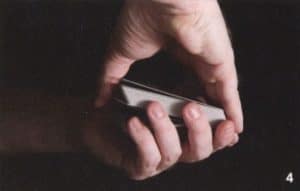
In this example as well as those to follow, once you’ve set the jog, catching the break itself is a relatively simple matter. Use the right hand to square the pack from above, and, as you do, contact the inner edge of the in-jogged card with the joint of your right thumb. Allow the cards below the jog to fall slightly – and use the right fourth finger pad to apply pressure to the right edge of the packet as described above (photo 4). Take care not to raise the deck with the right thumb – that always gives you away.
Is it Possible to Remove Your Card Magic Bottlenecks and Speed Your Progress by Ten Times?
Click Here to Find Out How>
Openly Spreading the Cards to Get the Break
Unfortunately, the Overhand Shuffle won’t always do the trick. Many effects demand that you catch the break without first disturbing the order of the cards.
In these cases, you can simply spread through the cards – all the way through the pack. As you get to the final few cards of the deck, briefly glance down and sight the correct number of cards. Use the right third and fourth fingertips to injog the card above the selected card (photo 5), then close the spread and get the break from the jog, just as described above. This procedure makes it much more difficult for anyone to notice as you get your break. Just as with the Overhand Shuffle method described above, patience is the key. Spread through the cards naturally, stopping here and there, and you’ll provide ample ‘cover’ for your secret actions (photo 6)!
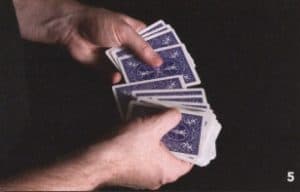
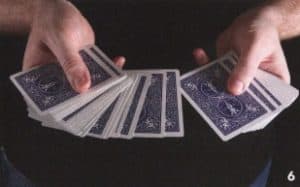
During the spreading action, pause the spread three or four times with a few cards widely spread. By the time you get to the end of the pack and sight your cards, not only will the action be completely congruent, the audience will have lost all interest thanks to the repetition. This one tip alone would have made my own card magic 3x stronger if I’d made use of it 10 years earlier!
This is a simple action – not difficult to execute. The key is to make sure you have something to say as you go through the actions, and the patience to carry out the whole sequence. Otherwise, you’ll be seen rushing through the spread to get a closer look at the last five cards. They audience may not no what you’re doing, but they’ll know you’re doing something…and that’s what you want to avoid!
Advanced Methods: Cliff Green and Herb Zarrow
For most magicians, the above methods will get you exactly where you want to go. However, if you like to practice and are aiming for the most direct methods ever developed, the following advanced methods may be for you. They don’t require any spreading, shuffling, or ‘extra’ handling of the cards.
The Imperceptible Get-Ready
When I first discovered this method in Cliff Green’s Professional Card Magic, it quickly became my favorite approach. Start with the cards in dealing position, place the thumb across the back of the deck, and use the left first finger tip to apply pressure to the outer right hand corner of the bottom cards of the pack (photo 7). This causes these cards to flair out at the inner right corner of the deck (photo 8). Assuming you’ve found a good moment for cover, just glance down and sight the number of cards you want. Then use your fourth finger to slightly pull down on, and catch a break above, the desired number of cards.
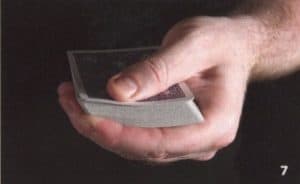
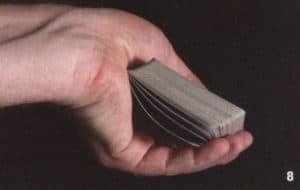
This method works wonderfully between tricks, when the audience relaxes. If you use this method during an actual presentation, do it under heavy cover: for example, after you say, “Look at your card and show it to the entire audience!” Everyone looks at the card. As they do, you glance down and catch the break.
The Double and Triple Buckle
I first fell in love with Green’s method, at least in part, because it was so much easier than Herb Zarrow’s Double Buckle.
However, the Zarrow method has something going for it that can make it worth the trouble: it doesn’t require you to look at the deck at all! Simply relax and drop the deck out of frame. Then use the left first finger to buckle one, two, or three cards as you desire (photo 9).
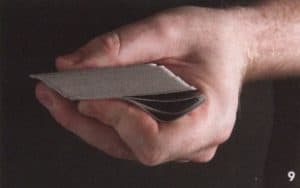
While Zarrow buckled each card with a different finger (the first finger buckled the bottom card, the second finger the card above it, and even the third finger the card above that), the end result is the same.
This technique, while the toughest to learn, is one of the easiest to cover. Use your right hand to grasp a spectator’s shoulder. It only takes a moment, and under that powerful cover, you’ve got your break. To learn more about the Double Buckle, check out Zarrow, A Lifetime Of Magic by David Ben. (Specifically page 62, where it is fully detailed how Marlo published the idea in The Cardician).
– PART THREE –
Larry’s Lesson
On my first trip to California, around 1996, I was lucky enough to spend the evening in the living room of my favorite cardman: Larry Jennings. I remember at the time asking Larry if he could help me learn the Pinky Count. I’d heard it was possible to do it beautifully, but I couldn’t get there myself, no matter how hard I tried. When I shared my concern with Larry, he laughed, and told me not to worry. In his opinion, it wasn’t a good approach. Now remember, Larry Jennings had big, strong hands. But even with those bear-like mitts, he didn’t imagine that anyone should use their weakest finger to do the heaviest lifting – and still expect soft and natural results.
That night, Larry taught me a method I use almost every time I perform. As it happens, this method was first published by Robert-Houdin about two centuries ago.
In the following description, both hands play distinct, separate roles. If you layer them in the order presented here, you’ll find that you can progress pretty quickly to the Triple Lift Get-Ready we’ll discuss toward the end of the article.
The Left Thumb Action
Starting with the pack in dealing position, prepare by relaxing the left fingers and allowing the cards to bevel slightly to the right, so that the deck rests more fully in the fork between the first finger and thumb.
At the same time, cock back your left thumb to the exact position shown in photo 1. Many students find this thumb position a little uncomfortable at first but it is an important one, and you will become more comfortable with it over time. Use the side of the thumb to push the top card over about a half inch, until the knuckle reaches the same starting position formerly held by the side of the thumb tip (photo 2).
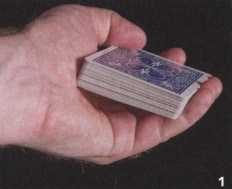
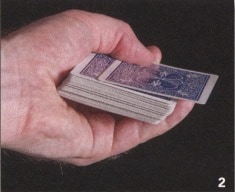
During this action, the constant position of the first finger at the front of the pack keeps the card in alignment.
Now you’ll pull the top card back onto the deck and catch a fourth finger flesh break beneath it in the process. Your thumb pulls the top card once again flush with the deck. Again, the first finger plays a crucial role by keeping the front edges of the card and deck aligned.
As the top card returns to its former position, use the outer phalanges of the second and third fingers to return to the side of the pack, pressing down lightly on the top card. This causes a bit of flesh from the pad of the fourth finger to get trapped between the card and the deck. If the second and third fingers don’t apply this pressure, the audience will see the top card rise up – a tell-tale sign that something suspicious is happening (photo 3 and 4 below).
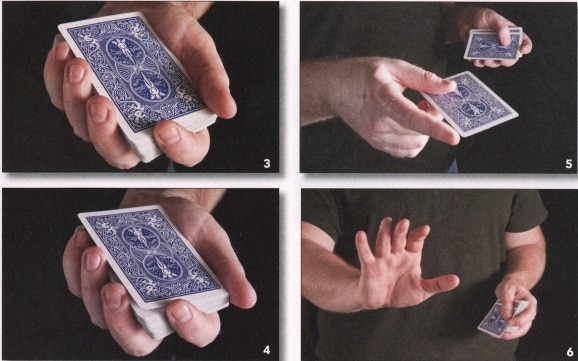
Practice this action a lot. For best results, master it before you continue.
The Right-Hand Cover and The Left-Hand Replacement
In performance, you’ll cover the left-hand action just described with your right hand in order to get a break under the top two cards. Starting from scratch, cock your left thumb as already described and push the top card of the deck toward the right. Take it with your right hand at the right edge and use it to gesture toward the audience as you make some relevant remark or ask a justified question. Remember, in order for this cover to be effective, you must really invest in whatever you choose to say. Under the cover afforded by the physical gesture and the accompanying remark, execute the left-hand break action described above (photo 5).
Use the left thumb to clamp the right-hand card onto the deck, then pull it flush with the cards beneath. Mechanically, this is identical to the second half of the left-thumb action already taught. The first finger at the front of the pack keeps the card in alignment. As you pull the card back onto the deck, use the right hand to make another different gesture toward the audience. Again, focus on the gesture, not the cards (photo 6).
You now have a fourth finger flesh break beneath two cards.
The Lock
In order for any block of multiple cards to stay in alignment during the turnover, the block must begin in alignment. Now is the time to make sure that the cards above the break are perfectly squared, locked, and loaded for the turnover.
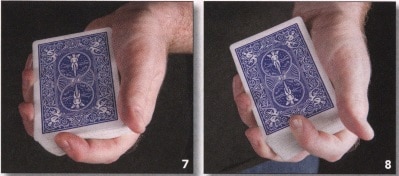
Use the first finger to push the entire deck just a touch back in the hand (photos 7 and 8). At first, this will test the gentleness of your grip. Only your first finger moves; the others stay in position as the deck slides inward. This action squares the deck perfectly.
If you feel you need even more support, use the third fingerpad to press firmly against the right side of the double card above the break, bowing the card concavely (just a bit), and further cementing the cards together going into the Double Lift (photo 9).
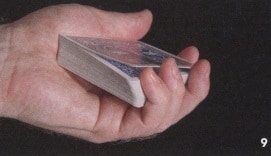
One Hand Method for Obtaining a Break
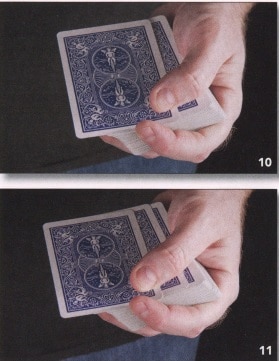 Cock back the left thumb as you would to get a break under one card; this is the first action you learned in this article (see photo 1 again). Push the card over as you’ve already learned to do. In this position, use the thumb knuckle to apply pressure to the second card, then push that card over to the right as well (photo 10). The left thumb stops pushing the moment the second card rides over the fourth fingertip (photo 11). Use the coordinated actions of the thumb, fourth, third, and second fingers you’ve already learned in order to square the pack. You’ll find the first finger invaluable in keeping the cards aligned during this process.
To cover this action, gesture with the right hand or use it to grasp a spectator by the arm. By now you’ve noticed that you don’t need a card in your right hand for misdirection! This method is highly effective, but remember to master the first methods before you acquire this one. Ladder up to this ultimate approach and you’ll master it much more quickly.
Putting It Together: The Three-Card Break
You’ve made it: the Triple Lift Get-Ready is now at your disposal. First, push a card off the deck. Take it with the right hand and gesture with it toward the audience. During that cover, use the left thumb to push and catch a break below two cards via the method just described. Replace the right-hand card on top of the deck. As you pull the card flush and lock it in, you have your break below three cards.
Conclusion
Larry’s lesson to me that night – and one that I try to communicate to my own students – was clear: rather than focus on finding a technically “invisible” approach to any particular problem, find a way to incorporate the spectators. Use them to provide your cover, and what were once card problems now become opportunities for meaningful interaction with your audience.
 About the Author:
Aaron Fisher is regarded as one of the world's greatest sleight of hand artists and online magic coach. You can get instant access to all of Aaron's training inside Conjuror Community.
